2) Make another tab in your Chrome or whatever browser you are using, go back to your blog and click on Layout, you will see boxes that says "Add A Gadget." Click on one on the side, search through the App Store for the HTML Gadget, then add it. And once the HTML box is open, waiting for you to type in the HTML code. Leave it open.
3) Go back to your first tab with the post that you saved with the button photo. Click on HTML button next to COMPOSE on the upper left area.
4) You will see an html example like this:
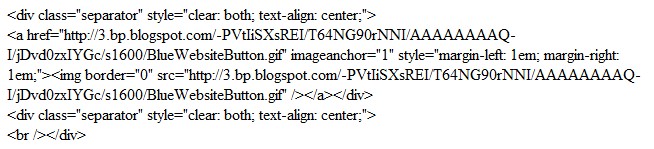
5) Change the "a href" line to a page you want that button to go to.

I changed it to:

If you want a real page, just set up a separate page and type up your information or whatever you wish to say. But set your date on the page in the option on the right side under labels to a date that's set very very far back and publish it. Then use the page's address for your button.
6) Copy the changed code and paste it in the HTML gadget of your Layout. For more buttons, just repeat the same thing for each button IN ORDER the way you want it to be set up and put in the SAME HTML gadget you set up in your Layout.
The only thing that I'm not positive about is how to set up the tabs on the top so they are side by side. If you want me to figure that out and post it here, LMK! Or if you DO know how, please let me know so I can let others know how to do it. Thanks!!
Presto! Done!
No comments:
Post a Comment
Your comment will be posted once it is approved. Thank you for sending a comment! Have fun in the Spiral!